vscode 扩展开发
扩展地址
扩展已经上架vscode 点击这里查看

原因
原因
- 学习 vscode 扩展开发方法
- 编写自己的 vscode 扩展
- 为了更好的使用 vscode
- 为了划水(bushi)
扩展介绍
介绍
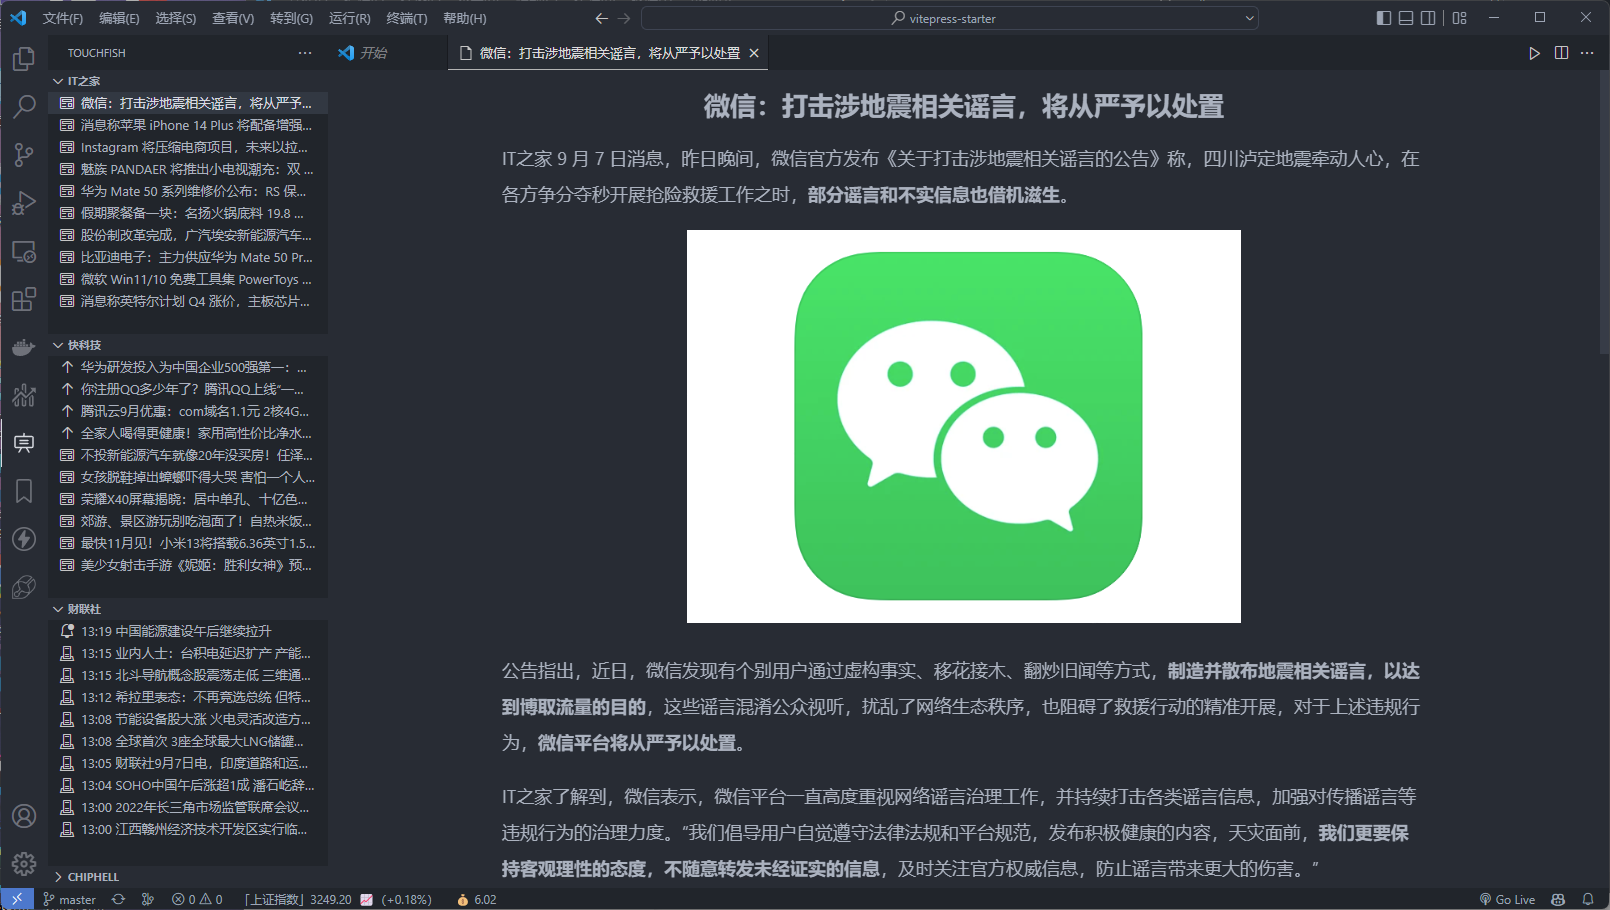
- 这是一个用来看新闻的扩展
- 包含 it 之家,快科技,chipHell,财联社四个新闻源的新闻
- 定时刷新新闻功能
- 点击查看新闻功能
- 配置新闻显示数量,显示字数,刷新时间等设置
准备工作
开始
- vscode 官方扩展开发文档 点击这里
- 新建一个文件夹,运行
npm install -g yo generator-code安装 vscode 扩展生成器 - 运行
yo code生成一个扩展
扩展结构
bash
├── .vscode
│   ├── launch.json     // 用于启动和调试扩展的配置
│   └── tasks.json      // 用于编译 TypeScript 的构建任务的配置
├── .gitignore          // 忽略构建输出和 node_modules
├── README.md           // 扩展功能的可读描述
├── src
│   └── extension.ts    // 扩展源代码(这个是入口文件)
├── package.json        // 扩展清单(这个也很重要)
├── tsconfig.json       // TypeScript 配置
开始开发
开始开发
- 我们开发的是一个新闻查看的扩展,所以我们使用的是 vscode 扩展里面的树视图 api,这个 api 可以让我们自定义一个树视图,并且可以在树视图里面添加节点,点击节点可以触发事件
- 扩展文档 点击这里
1,添加视图
json
// package.json
{
  "activationEvents": ["onView:view.newsList"],
  "contributes": {
    "views": {
      "newsList": [
        {
          "id": "view.newsList",
          "name": "News"
        }
      ]
    }
  }
}
2,新建一个生成新闻的类
typescript
import {
  EventEmitter,
  ProviderResult,
  TreeDataProvider,
  TreeItem,
} from "vscode";
import { compareNews, formatData } from "../utils/util";
import { getNewsList } from "../api/ithome";
import { showNewsNumber } from "../config";

export class ItHomeProvider implements TreeDataProvider<TreeItem> {
  private update = new EventEmitter<TreeItem | void>(); // 用于触发刷新
  readonly onDidChangeTreeData = this.update.event;

  private newsList: TreeItem[] = [];

  constructor() {
    this.getData();
  }

  async getData() {
    // this.newsList = [];
    await getNewsList().then((res) => {
      let news = formatData(res.data.newslist).slice(0, showNewsNumber);
      this.newsList = compareNews(
        this.newsList,
        news,
        "bell-dot",
        "notebook-render-output"
      );
    });
    this.update.fire();
  }

  getTreeItem(element: TreeItem): TreeItem | Thenable<TreeItem> {
    return element;
  }

  getChildren(element?: TreeItem): ProviderResult<TreeItem[]> {
    return this.newsList;
  }
}
3,注册视图
typescript
// extension.ts
export function activate(context: vscode.ExtensionContext) {
 // 注册树列表提供者,需要在json文件中注册(activationEvents)
 const newsProvider = new ItHomeProvider();
 vscode.window.registerTreeDataProvider("view.newsList", newsProvider);
}
4,编写刷新新闻的命令
typescript
/**
 * 刷新之家树列表
 * @param newsProvider  数据提供者
 * @returns  指令
 */
export const refresh = (newsProvider:ItHomeProvider)=>{
  // 提供一个async 会触发vscode加载小横条
  return vscode.commands.registerCommand("itHome.refresh",async ()=>{
    await newsProvider.getData();
    // vscode.window.showInformationMessage("新闻已刷新!");
  });
};
5,编写打开新闻的命令
typescript
/**
 * 打开之家新闻详情
 */
export const openUrl = vscode.commands.registerCommand('itHome.openUrl', async (title: string, time: string, id: number) => {

  // 如果没有创建过webview,则创建一个
  if (!isCreatePanel) {
    panel = createPanel();
  }
  panel!.webview.html = "加载中....";
  // 获取新闻详情
  await getNewsDetail(id).then(res => {
    panel!.webview.html = `
    <!DOCTYPE html>
    <html lang="en">
    <head>
      <meta charset="UTF-8">
      <meta name="viewport" content="width=device-width, initial-scale=1.0">
      <meta http-equiv="X-UA-Compatible" content="ie=edge">
      <title>Document</title>
      <link rel="stylesheet" href="https://www.ithome.com/css/detail.min.css">
      <style>
        p {
          font-size: 18px;
          line-height: 2;
        }
        img{
          max-width: 60%;
        }
        .news_detail{
          width: 75%;
          margin-left: 12.5%;
        }
      </style>
    </head>
    <body>
      <h1 style="text-align:center" >${title}</h1>
      <div class="news_detail">${res.data.detail}</div>
    </body>
    </html>
  `;
  });
  panel!.title = title;
});
6,注册刷新和打开新闻的命令
typescript
// extension.ts
export function activate(context: vscode.ExtensionContext) {
  // 注册刷新新闻的命令
  context.subscriptions.push(refresh(newsProvider));
  // 注册打开新闻的命令
  context.subscriptions.push(openUrl);
}
7,注册命令
json
// package.json
{
  "activationEvents": ["onView:view.newsList"],
  "contributes": {
    "views": {
      "newsList": [
        {
          "id": "view.newsList",
          "name": "News"
        }
      ]
    },
    "commands": [
      {
        "command": "itHome.refresh",
        "title": "刷新新闻"
      },
      {
        "command": "itHome.openUrl",
        "title": "打开新闻"
      }
    ]
  }
}
8,注册侧边栏按钮
侧边按钮
- vscode侧边栏按钮的注册需要在package.json里面注册
- 可以直接显示在vscode的侧边栏,更加方便
json
{
  "activationEvents": ["onView:view.newsList"],
  "contributes": {
    ...,
    "viewsContainers": {
      "activitybar": [
    {
     "id": "touchfish",
     "title": "TouchFish",
     "icon": "assets/training.svg"
    }
   ]
    }
  }
}
9,欢迎页面
可以打开当前扩展的设置页面
json
{
  "views": {
   "touchfish": [
    {
     "name": "新闻",
     "id": "view.newsList"
    },
    {
     "id": "view.setting",
     "name": "设置",
     "visibility": "hidden"
    }
   ]
  },
  "viewsWelcome": [
   {
    "view":"view.setting",
    "contents": "[🛠打开配置页](command:touchfish.openConfigPage) \n 停止内卷,享受摸鱼!欢迎使用摸鱼小工具!😘😘😘😘😘😘😘😘"
   }
  ],
}
注册点击事件
typescript
// 打开设置
export const openSetting = commands.registerCommand('touchfish.openConfigPage', () => {
  commands.executeCommand('workbench.action.openSettings', '@ext:ylw.touchfish');
});
export function activate(context: vscode.ExtensionContext) {
context.subscriptions.push(openSetting);
}
10,打包
1,修改package.json里面的version
2,打包
bash
npm install -g vsce
vsce package
11,发布
TIP
vscode扩展上传文档
1,到 devops创建一个access token,查看文档 https://code.visualstudio.com/api/working-with-extensions/publishing-extension#get-a-personal-access-token
2,创建扩展市场的账号,点击这里
bash
# 登录
vsce login ylw
# 发布
vsce publish